By Mariana Costa Oliveira • Tested in my kitchen • Updated June 2026
I once decorated 48 cupcakes for a wedding and showed up with frosting that had melted into pastel puddles. The venue had no air conditioning. It was 34°C in São Paulo. The bride was gracious. I was mortified. That day I learned that decorating cupcakes is not just about what looks good in your kitchen. It is about what survives the journey to the event.
This guide covers decorating techniques for three occasions — birthdays, weddings, and baby showers — with practical advice on what works, what fails, and what I wish I had known before I piped my first swirl. Every technique here has been tested in my home kitchen with basic tools and no formal training.
The Foundation: Start with a Level Cupcake
Before you decorate, the cupcake itself must be right. A domed top is harder to frost cleanly. A cracked surface tears when you spread buttercream. A sunken center creates a frosting pool that looks amateur.
How I level cupcakes: If a cupcake domes too much, I use a serrated knife to slice off the top, creating a flat surface. I save the dome pieces for cake pops or trifle. For birthday cupcakes, I sometimes leave a slight dome — it adds height under the frosting. For weddings, where precision matters, I always level.
What I learned: A level cupcake is easier to decorate than a perfect dome. Do not fight the shape. Work with it. If your cupcakes consistently dome, reduce the oven temperature by 10 degrees and bake 2 minutes longer. The slower rise creates a flatter top.
Decorating for Birthdays: Bold, Fun, and Forgiving
Birthday cupcakes are the most forgiving decoration project you will undertake. Kids do not care about perfect symmetry. They care about color, height, and sprinkles. Parents care about photos. Your job is to balance both.
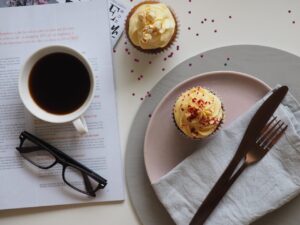
The Classic Swirl
This is my go-to for birthday parties. It looks impressive, pipes quickly, and hides imperfections.
What you need: A large open star tip (Wilton 1M or equivalent), a disposable piping bag, and American buttercream at room temperature.
Step-by-step:
- Hold the piping bag vertically above the cupcake center, tip 1cm above the surface.
- Squeeze firmly and pipe a spiral starting from the outside edge, moving inward.
- When you reach the center, stop squeezing and pull straight up, creating a peak.
- The entire motion takes 3–4 seconds. Do not overthink it.
Pro tip: For extra height, pipe a small mound of frosting in the center first, then pipe the swirl over it. This creates a tall, bakery-style cupcake that photographs well.
What I learned: My first swirls were lopsided because I moved my hand in an oval instead of a circle. I practiced on parchment paper for 20 minutes before touching a cupcake. Now I can pipe a dozen swirls in under 5 minutes. Practice on paper first. It saves cupcakes.
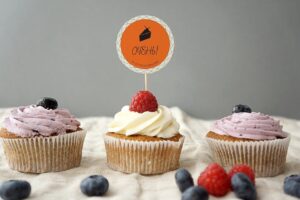
Sprinkles and Toppings
Birthday cupcakes demand color. But not all sprinkles work the same way.
- Jimmies (rod sprinkles): Best for covering frosting. They stick easily and do not bleed color.
- Nonpareils (tiny balls): Bleed color into buttercream within 30 minutes. Add them just before serving.
- Confetti quins (flat discs): Hold color well. Good for themed parties.
- Edible glitter: Adds sparkle to photos. Apply with a small brush or dusting wand.
Application method: Pipe the swirl, then immediately dip the frosted cupcake into a bowl of sprinkles, rotating gently. The sprinkles stick to the fresh buttercream. For partial coverage, hold the cupcake at an angle and sprinkle by hand.
What I learned: I once added nonpareils to 24 cupcakes the night before a party. By morning, the buttercream was streaked with pink and blue dye. The cupcakes looked tie-dyed, not decorated. Now I add nonpareils no more than 2 hours before serving. Jimmies can go on the night before.
Themed Toppers
For character-themed birthdays, I use simple fondant toppers made with cookie cutters. A circle cutter, a star cutter, and a number cutter handle 80% of birthday requests.
Simple fondant topper method:
- Roll white fondant to 3mm thickness on a surface dusted with cornstarch.
- Press cookie cutter firmly, wiggle slightly, lift.
- Let dry on parchment paper for 2 hours.
- Paint details with food coloring gel and a small brush, or use edible markers.
- Attach to cupcake with a dab of buttercream.
What I learned: Fondant toppers soften in humidity. In São Paulo summers, I make them the day before and store them in an airtight container with a packet of silica gel. Without the silica gel, they sweat and lose shape. This detail saved my last-minute orders.
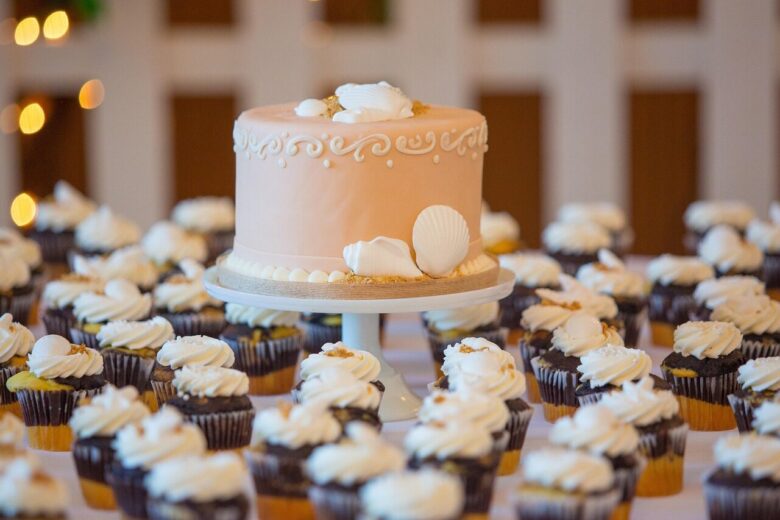
Decorating for Weddings: Elegant, Minimal, and Precise
Wedding cupcakes are a different discipline. They must look identical, survive transport, and complement the event’s aesthetic. There is no room for “close enough.”
The Rose Swirl
This is my signature wedding decoration. It looks like a piped rose but requires less skill than actual rose piping.
What you need: A large closed star tip (Wilton 2D), Swiss meringue buttercream, and a turntable if you have one.
Step-by-step:
- Pipe a small cone of buttercream in the center of the cupcake. This is the rose base.
- Hold the tip at a 45-degree angle against the cone.
- Squeeze and wrap the buttercream around the cone in a spiral, moving upward slightly with each rotation.
- After 3–4 rotations, taper off by reducing pressure and pulling the tip away.
Pro tip: Swiss meringue buttercream is essential for weddings. It pipes smoother than American buttercream, holds shape in warm venues, and tastes less sweet — which adult wedding guests appreciate. I make it the day before and refrigerate overnight. It pipes perfectly when cold and comes to room temperature by serving time.
What I learned: My first wedding order was for 100 cupcakes with rose swirls. I practiced on 50 cupcakes before I felt confident. The bride wanted them all identical. I learned that the key to uniformity is consistent pressure and consistent starting position. I mark the center of each cupcake with a tiny dot of buttercream before piping. It gives me a target.
Color Matching
Wedding color palettes are specific. “Blush pink” is not a standard color. You need to match the exact shade.
My method:
- Ask the client for a fabric swatch, a photo, or a Pantone code.
- Mix a small test batch of buttercream with gel food coloring.
- Spread a thin layer on white paper and compare to the swatch in natural light.
- Adjust in tiny increments. Gel colors darken as they sit. Mix lighter than the target and wait 30 minutes.
What I learned: I once matched a color perfectly in my kitchen’s warm LED light. At the outdoor wedding venue, the color looked completely different — too orange. Now I check colors in natural daylight before confirming. I also mix 20% extra buttercream in the matched color. Weddings always need a few extra cupcakes, and rematching a color exactly is nearly impossible.
Transport and Display
Wedding cupcakes must survive car rides, venue setup, and hours on a dessert table.
- Transport: Use cupcake boxes with individual inserts. Do not stack. Keep boxes flat on the car floor, not the seat. Seat angles cause sliding.
- Display: Tiered stands look beautiful but create pressure on bottom-tier cupcakes. I use a stand with wide spacing between tiers and place a cardboard circle under each cupcake for support.
- Temperature: Ask the venue about air conditioning. If none, use American buttercream instead of cream cheese. If outdoor, use Swiss meringue. If above 30°C, consider fondant toppers instead of piped frosting.
What I learned: The melted wedding cupcakes I mentioned at the start? They were cream cheese frosting at an outdoor summer wedding. Now I ask three questions before accepting a wedding order: indoor or outdoor? Air conditioning? Temperature forecast? The answers determine my frosting choice. No exceptions.
Decorating for Baby Showers: Soft, Sweet, and Gender-Neutral
Baby shower cupcakes walk a line between cute and tasteful. You want them to feel celebratory without being cartoonish. Most of my baby shower orders are gender-neutral or soft pastel, even when the parents know the gender.
The Soft Swirl with Pearl Details
This is my most requested baby shower decoration. It is simple, elegant, and works for any color scheme.
What you need: A large round tip (Wilton 1A), pastel buttercream, and edible pearls or dragees.
Step-by-step:
- Pipe a tall, soft swirl using the round tip. The round tip creates smooth ridges rather than star points, giving a softer look.
- Place 3–5 edible pearls in a cluster at the base of the swirl.
- Alternatively, place a single pearl on top of the swirl peak for a minimalist look.
Pro tip: For gender-neutral showers, I use pale yellow, mint green, or lavender buttercream with white pearls. For known genders, I use soft pink or soft blue with matching pearls. I never use bright primary colors for baby showers — they feel too harsh for the occasion.
What I learned: Edible pearls are technically safe to eat but very hard. I warn clients that the pearls are decorative and should be removed before eating, especially for children. One client gave a cupcake to a toddler who bit into a pearl and cried. Now I include a small note with every baby shower order: “Remove decorative pearls before serving to young children.”
Tiny Toppers and Silhouettes
For themed baby showers, I use small fondant cutouts instead of full toppers. A 2cm baby onesie, a tiny footprint, or a small heart adds theme without overwhelming the cupcake.
Method:
- Roll fondant to 2mm thickness.
- Use mini cookie cutters or a small knife to cut shapes.
- Let dry for 1 hour.
- Attach to frosting with a tiny dab of buttercream.
What I learned: Mini toppers are faster to make than full-size ones and look more refined. A full-size fondant baby bottle on a cupcake looks like a toy. A 2cm baby bottle silhouette looks like art. Scale matters.
Color Psychology for Baby Showers
Clients rarely ask for this, but I guide them. The color of the frosting affects the mood of the event.
- Soft yellow: Warm, gender-neutral, works in any season. My most requested baby shower color.
- Mint green: Fresh, modern, pairs well with white and gold accents.
- Lavender: Calming, slightly feminine without being explicitly gendered.
- Peach: Warm, welcoming, photographs beautifully in natural light.
- Soft grey: Sophisticated, pairs with any accent color, works for “sprinkle” showers (second or third baby).
What I learned: I once made bright pink cupcakes for a baby girl shower. The mother texted me after: “They were beautiful but looked like a birthday party.” Now I show clients a color palette before I bake. Soft pastels always win for baby showers. Bright colors feel wrong, even when they match the theme.
Tools That Actually Matter
I have bought dozens of decorating tools. Most collect dust. These are the ones I use for every order:
| Tool | Why It Matters | Cost |
|---|---|---|
| Large open star tip (Wilton 1M) | Creates the classic swirl. Works for all occasions. | $3 |
| Large closed star tip (Wilton 2D) | Creates rose swirls and tighter patterns. | $3 |
| Large round tip (Wilton 1A) | Soft swirls, dots, and writing. | $3 |
| Disposable piping bags | No washing. Cut to fit any tip. Essential for speed. | $5 per 100 |
| Offset spatula | Smoothing frosting, lifting cupcakes, cleaning edges. | $8 |
| Cookie cutters (basic shapes) | Fondant toppers for any theme. | $10 set |
| Edible markers | Details on fondant without brushes or mixing colors. | $6 |
| Turntable (optional) | Makes piping smoother and more consistent. | $15 |
What I learned: I spent $80 on a professional piping set with 50 tips. I use 4 of them. The rest are decoration for my drawer. Buy the basics first. Master them. Then expand if a specific technique demands it.
Summary: Decoration by Occasion
- Birthdays: Bold swirls, bright sprinkles, themed toppers. Forgiving and fun. American buttercream.
- Weddings: Rose swirls, precise color matching, elegant minimalism. Swiss meringue buttercream. Plan for temperature.
- Baby showers: Soft swirls, pastel colors, tiny pearls or silhouettes. Gentle and refined. Any stable buttercream.
Related Reading
For a complete guide to frosting types and when to use each one, read our best frosting for cupcakes guide — including buttercream, cream cheese, and ganache recipes tested for stability and flavor.
Final Thoughts
Decorating cupcakes is a skill, not a talent. I am not naturally artistic. My handwriting is messy. I cannot draw. But I can pipe a swirl, place a pearl, and match a color. Those three skills cover 90% of cupcake orders.
The difference between a home baker and a decorator is practice on parchment paper, not cupcakes. I have piped 500 swirls on paper. I have ruined 50 on actual cupcakes. The paper practice was free. The cupcake failures were expensive. Practice first. Decorate second.
If you are decorating for your first event — a child’s birthday, a friend’s wedding, your own baby shower — start simple. One technique. One color. One topping. Perfect that before you add complexity. A perfectly executed simple decoration beats a poorly executed elaborate one every time.
Email me at contact@cupcakeku.com if you have a specific decoration challenge — a color you cannot match, a technique that is not working, or a transport problem you cannot solve. I have been there. I have melted frosting, smeared swirls, and delivered lopsided toppers. I will help you avoid the mistakes I made.
Now pick up your piping bag and practice on paper. Your cupcakes will thank you.
— Mariana Costa Oliveira, Cupcake Craft Studio, São Paulo
Mariana Costa Ota is a home baker and founder of Cupcake Craft Studio. She tests recipes, equipment, and decorating techniques in her own kitchen since 2018. No recipe makes it to the site without passing through her oven (and her honest judgment) first.