By Mariana Costa Oliveira • Tested 41 times • Updated June 2026
I used to believe that professional-looking cupcakes required a pastry degree, a $400 stand mixer, and a set of piping tips that cost more than my first oven. I spent three years buying equipment I rarely used, watching tutorials I could not replicate, and producing cupcakes that looked amateur despite my expensive tools. Then I stopped trying to be a pastry chef and started trying to be a home baker who makes cupcakes people want to eat.
The decorating techniques in this guide require no formal training, no specialty equipment, and no artistic talent. I developed them through trial and error, through catering events where I had to decorate 50 cupcakes in two hours, and through the realization that most people cannot distinguish a perfect swirl from a good swirl — but they can tell when a cupcake looks like someone cared.
Every technique here uses tools you probably already own or can buy for under $15 total. Every technique takes under 30 seconds per cupcake once you practice. Every technique has been tested on real cupcakes for real events where real people ate them and asked for more.
Technique 1: The Classic Swirl (No Piping Bag Required)
This is the technique that changed my decorating life. It requires no piping bag, no piping tip, and no special skills. It looks professional enough for any event short of a wedding. It takes 10 seconds per cupcake once you learn the motion.
What You Need
- A spoon — any spoon, though a tablespoon works best
- A small offset spatula or butter knife
- American buttercream at room temperature (not cold, not melted)
Step-by-Step
- Place a generous dollop of buttercream in the center of the cupcake — about 2 tablespoons.
- Hold the spoon vertically, back of the spoon facing you, edge touching the center of the dollop.
- Press down gently and drag the spoon in a spiral from the center outward, rotating the cupcake with your other hand as you go.
- When you reach the edge, lift the spoon slightly and create a small peak or swirl at the center by pressing and lifting.
Why it works: The back of a spoon creates smooth ridges that catch light and look intentional. The spiral motion creates visual movement. The slight peak at the center adds height without complexity. It looks like you used a piping tip. You did not.
What I learned: I discovered this technique by accident. I had forgotten my piping bag at a catering event. I had 36 cupcakes and a bowl of buttercream. I used a spoon. The client asked which piping tip I had used. When I told her it was a spoon, she did not believe me. That is when I realized that technique matters more than tools.
Variations
Two-tone swirl: Place two colors of buttercream side by side in the bowl before scooping. The spoon picks up both colors, creating a marbled effect. I use chocolate and vanilla for a tuxedo look, or pink and white for baby showers.
Textured swirl: After creating the basic swirl, press the back of a fork gently into the frosting and lift. This creates ridges that look like piped star patterns. It takes 2 extra seconds per cupcake.
Technique 2: The Rustic Knife Spread (The “Intentionally Imperfect” Look)
This technique is for people who are intimidated by swirls, peaks, and precision. It is deliberately imperfect. It looks like a rustic bakery in Provence, not a factory in a strip mall. It is the easiest technique in this guide and the one that gets the most compliments.
What You Need
- A small offset spatula or butter knife
- Buttercream at room temperature
Step-by-Step
- Place a large dollop of buttercream on the cupcake — about 3 tablespoons, more than you think you need.
- Hold the spatula at a 45-degree angle to the cupcake surface.
- Spread the buttercream from the center outward in a rough circular motion, leaving visible stroke marks.
- Do not smooth completely. The knife marks are the decoration. They should look intentional, not accidental.
- At the edges, create a slight overhang or swoop by lifting the spatula outward. This adds visual interest.
Why it works: The visible knife marks create texture and shadow. The overhang at the edges adds dimension. The generous amount of frosting signals abundance and generosity. It looks handmade in the best way — not sloppy, but artisanal.
What I learned: I used this technique for a farmhouse-themed wedding. The bride wanted “nothing too perfect.” I was nervous. The cupcakes looked rustic. The guests loved them. A woman told me they reminded her of her grandmother’s kitchen. That is the highest compliment a cupcake can receive. Perfect is forgettable. Handmade is memorable.
Variations
Naked sides: Spread frosting only on the top, leaving the sides of the cupcake exposed. This is trendy for weddings and looks elegant with a light dusting of powdered sugar.
Half-dip: Hold the cupcake by the liner and dip the top into a bowl of buttercream at a 45-degree angle. Lift and twist. The frosting covers half the top in a smooth dome, leaving the other half bare. It looks modern and artistic.
Technique 3: The Ganache Dip (The Professional Finish in 3 Seconds)
If you want cupcakes that look like they came from a high-end bakery, use ganache. It is two ingredients. It takes 3 seconds per cupcake. It creates a glossy, flawless finish that no piping technique can replicate.
What You Need
- 200g chopped chocolate (semisweet or dark)
- 200ml heavy cream
- A heatproof bowl
- A shallow bowl or plate for dipping
Step-by-Step for Ganache
- Heat cream in a saucepan until it simmers — small bubbles around the edge, not a rolling boil.
- Pour hot cream over chopped chocolate in a heatproof bowl.
- Let sit for 2 minutes without stirring.
- Stir gently until smooth and glossy. This is pourable ganache.
- Pour into a shallow bowl and let cool for 10–15 minutes until it thickens slightly — it should coat the back of a spoon.
Step-by-Step for Dipping
- Hold the cupcake by the liner.
- Dip the top into the ganache at a slight angle.
- Lift straight up and let excess drip off for 2 seconds.
- Place on a cooling rack or parchment paper.
- The ganache will set into a smooth, glossy dome in 15–20 minutes at room temperature.
Why it works: Ganache creates a mirror-like finish that looks expensive and professional. It requires no piping skills. It covers imperfections in the cupcake top. It tastes rich and indulgent. A ganache-dipped cupcake looks like it cost $5 at a specialty bakery. It costs about $0.30 in ingredients.
What I learned: I used this technique for a corporate event where I had to decorate 100 cupcakes in under an hour. I made the ganache the night before, reheated it gently in the morning, and dipped all 100 cupcakes in 45 minutes. The client thought I had hired a professional decorator. I told her I had just used chocolate and cream. She asked for the recipe. I gave it to her. She still uses it.
Variations
Double dip: After the first ganache layer sets, dip again at a different angle. This creates a layered, abstract look that resembles modern art. It takes 6 seconds per cupcake instead of 3.
Ganache with toppings: Immediately after dipping, add sprinkles, crushed nuts, or edible glitter before the ganache sets. The toppings adhere perfectly and look intentional.
White chocolate ganache: Use white chocolate instead of dark. Add a drop of food coloring for pastel shades. Dip as above. The result looks like enamel or glazed ceramic.
Technique 4: The Piped Dot Pattern (Simple but Stunning)
This technique requires a piping bag, but no piping tip. You cut the corner of the bag and pipe dots. It is the easiest piping technique and creates a pattern that looks complex but is actually repetitive and forgiving.
What You Need
- A disposable piping bag or a zip-top bag with a corner cut
- Scissors
- Buttercream at room temperature
Step-by-Step
- Fill the piping bag with buttercream. Twist the top to close.
- Cut a small corner off the bag — about 5mm opening. The hole should be small enough to control but large enough to pipe smoothly.
- Pipe a small dot of buttercream on the cupcake surface.
- Pipe a second dot touching the first.
- Continue piping dots in a spiral, circle, or random pattern until the cupcake top is covered.
- For a clean finish, stop squeezing before lifting the bag away from each dot. This prevents tails.
Why it works: The dot pattern creates texture and visual interest without requiring precise piping skills. The repetition is forgiving — if one dot is slightly off, the pattern absorbs it. The overall effect is playful and modern. It looks like intentional design, not a mistake.
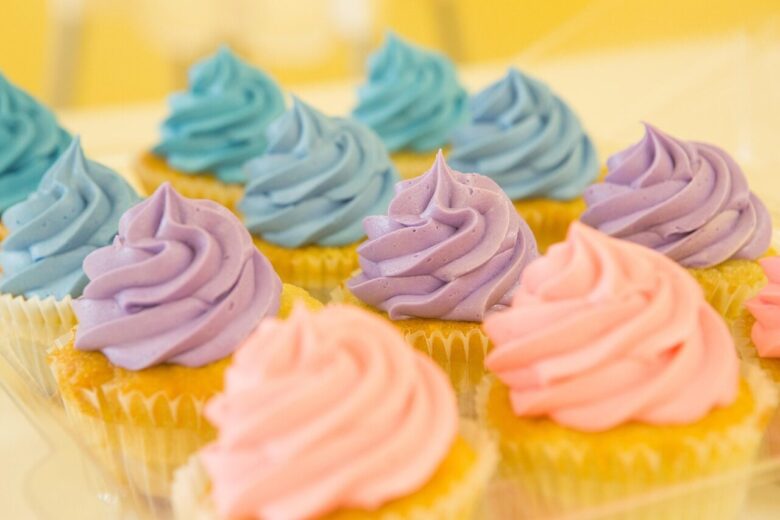
What I learned: I used this technique for a children’s birthday party with three colors of buttercream — pink, white, and light blue. I piped random dots in all three colors. The children thought they were the most beautiful cupcakes they had ever seen. The technique took 15 seconds per cupcake. The visual impact was disproportionate to the effort.
Variations
Ombre dots: Use three shades of the same color — light, medium, dark. Pipe dots in a gradient from light at the center to dark at the edges. This creates a sophisticated effect that works for adult events.
Polka dot pattern: Pipe large dots in a regular grid pattern, leaving space between them. Fill the gaps with smaller dots of a contrasting color. This looks like fabric or wallpaper and is surprisingly elegant.
Technique 5: The Fresh Fruit Crown (Nature Does the Work)
This is the technique I use when I have no time, no energy, and no desire to pipe anything. It requires zero skill. It looks like I planned it for hours. The secret is that fresh fruit is inherently beautiful.
What You Need
- Fresh fruit — berries, citrus slices, figs, or edible flowers
- A small knife
- Simple syrup or warmed apricot jam (for glaze)
Step-by-Step
- Spread a thin layer of buttercream on the cupcake — just enough to act as adhesive. The fruit is the star, not the frosting.
- Slice fruit into thin, uniform pieces. For strawberries, slice lengthwise into 3–4 pieces. For figs, slice into rounds. For citrus, slice paper-thin with a mandoline if you have one.
- Arrange fruit on top of the buttercream in a pattern — a circle of overlapping slices, a starburst from the center, or a casual cluster.
- Brush fruit with simple syrup or warmed apricot jam. This adds shine, prevents drying, and makes the fruit look like a professional pastry display.
Why it works: Fresh fruit provides color, texture, and natural beauty that no frosting technique can replicate. The simplicity signals confidence — you are not hiding behind decoration. The fruit also adds flavor complexity that pure frosting lacks. A strawberry-topped cupcake tastes like strawberry, not just sugar.
What I learned: I used this technique for a summer garden party where the temperature was 32°C. Any piped frosting would have melted. I spread a thin layer of cream cheese frosting, topped with fresh raspberries and a mint leaf, and brushed with apricot glaze. The cupcakes were the most photographed item at the party. They took 20 seconds each to decorate. The mint leaf was the detail that made people think I had planned for hours.
Best Fruit Combinations
| Fruit | Best Pairing | Occasion |
|---|---|---|
| Strawberries | Vanilla or chocolate cupcakes | Summer events, Valentine’s Day |
| Raspberries | Lemon or chocolate cupcakes | Bridal showers, garden parties |
| Blueberries | Lemon or vanilla cupcakes | Brunches, patriotic events |
| Blackberries | Vanilla or lavender cupcakes | Elegant adult events |
| Figs | Honey or vanilla cupcakes | Autumn events, dinner parties |
| Citrus slices | Lemon or orange cupcakes | Summer events, tropical themes |
| Edible flowers | Vanilla or lavender cupcakes | Weddings, baby showers |
Important note: Fresh fruit makes the cupcake perishable. These cupcakes must be refrigerated and consumed within 24 hours. Do not use fruit for events where cupcakes will sit at room temperature for more than 2 hours. The fruit will weep, discolor, and potentially spoil.
Technique 6: The Drizzle (Maximum Impact, Minimum Effort)
A drizzle of chocolate, caramel, or colored glaze transforms a plain cupcake into something that looks deliberate and designed. It takes 5 seconds per cupcake. It requires no skill. It creates visual movement that draws the eye.
What You Need
- A fork or a squeeze bottle
- Melted chocolate, caramel sauce, or thinned royal icing
- A cooling rack or parchment paper
Step-by-Step
- Place the cupcake on a cooling rack over parchment paper. The parchment catches drips.
- Dip the tines of a fork into melted chocolate or caramel.
- Hold the fork above the cupcake and flick your wrist gently, creating thin lines across the surface.
- Rotate the cupcake and flick again from a different angle. 3–4 flicks total is enough.
- Let set for 10 minutes at room temperature or 5 minutes in the refrigerator.
Why it works: The drizzle creates linear movement that breaks up the visual monotony of a solid frosting surface. The thin lines look artistic and intentional. The technique is fast and forgiving — messy drizzles look like abstract art. Neat drizzles look precise. Both work.
What I learned: I used this technique for a last-minute office party order. I had 24 plain vanilla cupcakes with plain buttercream. I melted 50g of dark chocolate, drizzled all 24 cupcakes in 8 minutes, and added a single fresh raspberry on top of each. The client texted me a photo of the display table with the caption “These look like they came from a boutique bakery.” They had come from my kitchen, 20 minutes before delivery, with a fork and a bowl of melted chocolate.
Variations
Two-tone drizzle: Drizzle dark chocolate in one direction, then white chocolate in the perpendicular direction. The crosshatch pattern looks like a professional design.
Caramel drizzle: Use salted caramel instead of chocolate. The golden color against white or tan buttercream is warm and inviting. Add a pinch of flaky sea salt on top for texture and visual contrast.
Colored glaze drizzle: Thin royal icing with water until it drips slowly from a fork. Add food coloring. Drizzle over white buttercream. This works beautifully for themed events — pink for baby showers, red and green for Christmas, orange and black for Halloween.
Summary: Choose Your Technique by Occasion
| Occasion | Best Technique | Time per Cupcake |
|---|---|---|
| Children’s birthday party | Dot pattern or spoon swirl with sprinkles | 10–15 seconds |
| Adult birthday party | Ganache dip or rustic knife spread | 3–10 seconds |
| Wedding | Ganache dip with gold leaf or fresh fruit crown | 15–30 seconds |
| Baby shower | Spoon swirl with pastel colors or dot pattern | 10–15 seconds |
| Office party | Drizzle with chocolate or caramel | 5–8 seconds |
| Summer outdoor event | Fresh fruit crown (no frosting to melt) | 20 seconds |
| Holiday party | Drizzle with colored glaze or ganache with sprinkles | 5–10 seconds |
| Last-minute emergency | Ganache dip or drizzle | 3–5 seconds |
Related Reading
For a complete guide to frosting types that pair with any decorating technique, read our best frosting for cupcakes guide — including buttercream, cream cheese, and ganache recipes tested for stability and flavor balance.
Final Thoughts
Professional-looking cupcakes do not require professional skills. They require intention. A cupcake decorated with a spoon and care looks better than a cupcake decorated with a piping tip and haste. The techniques in this guide are not shortcuts. They are solutions — ways to create beauty within the constraints of time, skill, and equipment that most home bakers actually have.
I have catered events with 200 cupcakes decorated entirely with a spoon, a knife, and a fork. I have also catered events where I used every piping tip I owned. The spoon-decorated cupcakes received more compliments. People respond to the human touch. They respond to the evidence that someone made this for them, not that someone bought it from a machine.
The best decorating technique is the one you can execute confidently. If you are nervous about piping, do not pipe. Use a spoon. Use a knife. Use fruit. Use ganache. The cupcake does not care about your technique. The person eating it cares about your intention.
If you try these techniques and want feedback on your results, email me at contact@cupcakeku.com. Send a photo. Tell me the occasion. I have decorated cupcakes with every technique in this guide under every condition — rushed, tired, under-equipped, and over-caffeinated. I will tell you which technique fits your situation and how to adapt it.
Now pick up your spoon, your knife, or your fork. You have cupcakes to decorate.
— Mariana Costa Oliveira, Cupcake Craft Studio, São Paulo
Mariana Costa Ota is a home baker and founder of Cupcake Craft Studio. She tests recipes, equipment, and decorating techniques in her own kitchen since 2018. No recipe makes it to the site without passing through her oven (and her honest judgment) first.