By Mariana Costa Oliveira • Tested over 6 years • Updated June 2026
When I started baking cupcakes in 2018, I used a muffin tin I found in my grandmother’s kitchen, paper liners from the supermarket, and a hand mixer that cost R$45. That equipment produced hundreds of cupcakes that people paid money for. I later upgraded to a stand mixer, a nonstick pan, and greaseproof liners. The cupcakes improved marginally. The experience improved significantly. But the lesson was clear: you do not need expensive equipment to make good cupcakes. You need the right equipment for your specific situation.
This guide covers the three pieces of equipment that matter most for cupcake baking — liners, pans, and mixers. I have tested dozens of each over six years. I have bought cheap versions that failed, expensive versions that were unnecessary, and mid-range versions that were perfect. This is not a list of the most expensive options. It is a list of what actually works, what is worth upgrading, and what you can ignore.
Cupcake Liners: The Detail That Matters More Than You Think
Liners seem trivial. They are paper circles that hold batter. But the wrong liner can make your cupcake stick, discolor, leak grease, or look cheap. The right liner can make a basic cupcake look professional. I have tested paper, foil, silicone, and greaseproof liners across hundreds of batches. Here is what I learned.
Paper Liners: The Standard Choice
Paper liners are what most home bakers start with. They are cheap, widely available, and come in endless colors and patterns. But not all paper liners are equal.
Standard paper liners: These are the thin, colorful liners you find in supermarkets. They cost about R$3 for 50. They work for casual baking. But they have problems:
- They absorb grease from the batter, creating translucent, oily spots on the outside
- They can stick to the cupcake, especially if the cupcake is warm when removed
- They soften and lose shape when filled with wet batter
- They do not provide structural support — a soft cupcake can bulge or distort the liner
My verdict: Standard paper liners are fine for practice baking, family events, and situations where appearance does not matter. I still use them for my own family’s weekend baking. They are not fine for events where presentation matters, for customers who will handle the cupcakes, or for recipes with high fat content that leak grease aggressively.
What I learned: I once used standard paper liners for a paid order of 24 chocolate cupcakes. The liners were pink with white polka dots — beautiful when empty. After baking, the grease from the chocolate batter had soaked through, creating translucent brown spots that looked like stains. The client was polite but disappointed. I now use greaseproof liners for every paid order. The extra cost is R$0.05 per cupcake. The difference in appearance is immeasurable.
Greaseproof Liners: The Professional Upgrade
Greaseproof liners are coated with a thin layer of wax or silicone that prevents grease from soaking through. They cost about R$8–12 for 50 — roughly double the price of standard liners. They are worth it for any cupcake that will be seen, sold, or photographed.
Advantages:
- No grease stains — the liner looks clean and crisp after baking
- Structural support — they hold shape better, even with soft batters
- Easy release — cupcakes peel away cleanly without sticking
- Professional appearance — the colors and patterns stay vibrant
Disadvantages:
- Higher cost — about R$0.15–0.25 per liner versus R$0.06 per standard liner
- Less variety in patterns — greaseproof liners tend to be simpler in design
- Can be harder to find in stores — I order mine online in bulk
My recommendation: If you bake cupcakes for anyone other than yourself, buy greaseproof liners. The brand I use is Wilton greaseproof, but any brand with a greaseproof or “no fade” label works. I buy 200 at a time and store them in a sealed container to prevent moisture damage.
What I learned: I tested five brands of greaseproof liners. Three performed identically. One was slightly thicker and held shape better. One was thin and peeled away from the cupcake during baking. The difference was not the price — it was the thickness. Hold the liner up to light. If you can see through it easily, it is too thin. If it blocks most light, it is thick enough to provide structure.
Foil Liners: The Special Occasion Choice
Foil liners are made of aluminum with a paper or wax interior. They are rigid, shiny, and provide maximum structural support. They cost about R$10–15 for 30.
Advantages:
- Maximum structural support — the cupcake cannot distort the liner
- Heat reflection — the foil reflects heat, creating slightly crisper edges
- Luxury appearance — the metallic shine looks premium and celebratory
- No grease absorption — completely impermeable
Disadvantages:
- Highest cost — about R$0.30–0.50 per liner
- Can create overbaked edges — the heat reflection sometimes browns the edges too much
- Less environmentally friendly — aluminum is not biodegradable
- Can be slippery to handle — the foil is smooth and can slide out of hands
My recommendation: Use foil liners for weddings, formal events, and occasions where the cupcake needs to look expensive. I use them for New Year’s Eve parties, wedding dessert tables, and corporate events. I do not use them for casual baking — the cost is unnecessary and the environmental impact bothers me.
What I learned: I used foil liners for a wedding order and noticed the edges of the cupcakes were slightly darker and firmer than usual. The foil reflected heat onto the edges. I now reduce oven temperature by 5 degrees when using foil liners and check 2 minutes early. This compensates for the heat reflection.
Silicone Liners: The Reusable Option
Silicone liners are reusable, flexible cups made of food-grade silicone. They cost about R$20–30 for a set of 12. They last for years.
Advantages:
- Reusable — one purchase lasts indefinitely
- Non-stick — cupcakes release easily without sticking
- Environmental — no waste from disposable liners
- Structural support — they hold shape like foil liners
Disadvantages:
- Require washing — each liner must be washed after use
- Can retain odors — silicone absorbs strong flavors over time
- Not suitable for events — they look utilitarian, not decorative
- Can be floppy — they need to be placed in a muffin tin to hold shape during filling
My recommendation: Silicone liners are excellent for home baking, recipe testing, and situations where you bake frequently for the same household. I use them for my weekly recipe testing — I bake, taste, and wash. No waste. No running out of liners. For events, I switch to paper or foil.
What I learned: I bought silicone liners in 2019 and used them for chocolate cupcakes exclusively for 6 months. When I switched to vanilla, the vanilla cupcakes tasted faintly of chocolate. Silicone absorbs flavors. I now dedicate specific silicone liners to specific flavors — chocolate-only, vanilla-only, citrus-only. Or I wash them immediately with baking soda to neutralize odors.
Liner Size Guide
| Size | Diameter (Base) | Height | Best For |
|---|---|---|---|
| Mini | 3cm | 2cm | Party platters, tastings, children |
| Standard | 5cm | 3cm | General baking, most recipes |
| Jumbo | 7cm | 4cm | Statement cupcakes, dessert replacements |
My recommendation: Standard size is the default. Mini is great for events where people want variety without commitment. Jumbo is rarely necessary — a standard cupcake with generous frosting is more satisfying than a jumbo cupcake with the same amount of frosting. Jumbo liners also require jumbo pans, which most home bakers do not own.
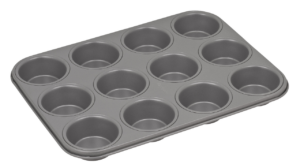
Cupcake Pans: The Foundation of Even Baking
The pan is the least glamorous piece of equipment but the most important for consistent results. A bad pan creates uneven baking, stuck cupcakes, and burned edges. A good pan is invisible — it does its job without drawing attention to itself.
Material: Nonstick vs. Aluminum
Nonstick pans: Coated with a nonstick surface that prevents cupcakes from sticking to the pan itself. This matters when you bake without liners or when liners fail and batter touches the pan.
Advantages:
- Easy cleanup — batter wipes away easily
- Good for liner-free baking — silicone or foil liners can be omitted
- Dark color absorbs heat — creates slightly browner edges
Disadvantages:
- Coating degrades over time — scratches reduce effectiveness
- Cannot use metal utensils — they scratch the coating
- Dark color can overbrown edges — reduce temperature by 10 degrees
- Shorter lifespan — nonstick coating lasts 3–5 years with regular use
Aluminum pans: Uncoated aluminum that conducts heat evenly and lasts indefinitely.
Advantages:
- Even heat distribution — aluminum conducts heat better than any other common material
- Indestructible — no coating to scratch or degrade
- Light color reflects heat — prevents overbrowning
- Lifelong — my grandmother’s aluminum pan is 40 years old and still works
Disadvantages:
- Requires liners — cupcakes will stick without them
- Can react with acidic batters — lemon or chocolate batters can discolor the pan slightly
- Requires more oiling if liner-free — not ideal for silicone or foil liner use
My recommendation: I own both. I use nonstick for recipe testing and casual baking where I might forget a liner or where cleanup speed matters. I use aluminum for paid orders, events, and any situation where even baking is critical. If you can only buy one, buy aluminum. It lasts forever and bakes more evenly. The extra cleanup is worth the consistency.
What I learned: I bought a cheap nonstick pan from a discount store. Within a year, the coating was scratched and the pan was baking unevenly — cupcakes on one side were done 3 minutes before cupcakes on the other side. I replaced it with a mid-range aluminum pan (R$60) and the difference was immediate. Every cupcake baked identically. The pan was the variable I had not considered.
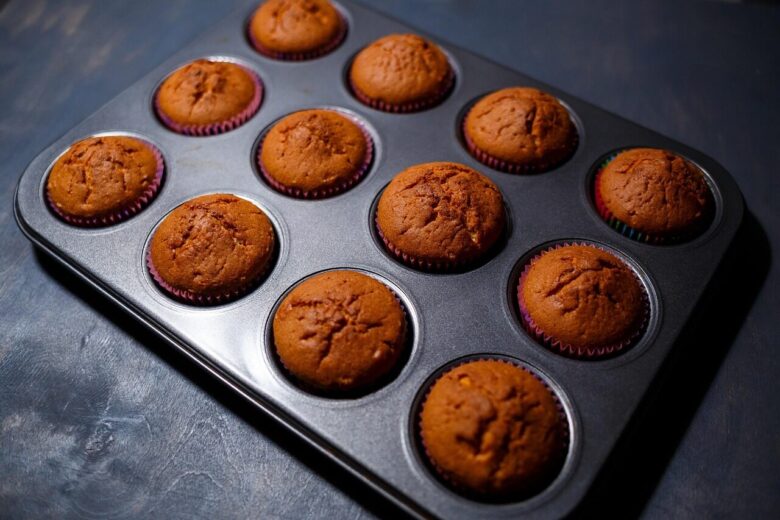
Pan Size and Capacity
Standard muffin tins hold 12 cupcakes. This is the size every recipe assumes. But there are variations:
- 6-cup pans: Useful for small batches, testing half-recipes, or kitchens with limited oven space. I own one for recipe development.
- 12-cup pans: The standard. Every home baker needs at least one.
- 24-cup pans (mini): For mini cupcakes. Useful for parties and tastings. I own one but use it rarely — mini cupcakes are more work per cupcake than standard size.
My recommendation: Start with one 12-cup aluminum pan. Add a 6-cup pan if you bake small batches frequently. Add a 24-cup mini pan only if you cater events regularly or have children who prefer mini sizes.
Pan Maintenance
Aluminum pans should be washed by hand with mild soap and a soft sponge. Dishwashers can discolor aluminum and create a chalky residue. Dry immediately to prevent water spots.
Nonstick pans should be washed by hand with a soft sponge — never abrasive scrubbers. Avoid metal utensils. If the coating begins to flake or scratch, replace the pan. Flaked coating is not food-safe.
What I learned: I put my first aluminum pan in the dishwasher once. It came out with a dull, gray film that took an hour of scrubbing to remove. Never again. Hand wash only. The 5 minutes of hand washing saves the pan’s appearance and performance.
Mixers: Hand vs. Stand
This is the question every home baker faces. Do you need a stand mixer? Or is a hand mixer enough? I used a hand mixer for three years before buying a stand mixer. I have now used both for three years each. Here is my honest assessment.
Hand Mixers: The Starting Point
A hand mixer is a small electric mixer with two beaters that you hold in your hand. It costs R$40–120 depending on brand and power.
Advantages:
- Affordable — entry-level models are cheap enough for any budget
- Compact — stores in a drawer, takes no counter space
- Versatile — can be used in any bowl, for any quantity
- Easy to clean — beaters detach and go in the dishwasher
- Sufficient for most recipes — creaming butter, mixing batters, whipping cream
Disadvantages:
- Requires holding — your arm gets tired during long mixing sessions
- Limited power — struggles with very thick doughs or large batches
- No hands-free operation — you cannot multitask while mixing
- Can splatter — requires careful bowl positioning to prevent mess
My recommendation: A hand mixer is sufficient for 90% of home bakers. If you bake 1–2 batches per week, make standard batters, and do not mind holding the mixer, you do not need a stand mixer. I used a R$45 hand mixer for my first two years of selling cupcakes. It never failed me. It never produced a bad batch. The stand mixer was a luxury, not a necessity.
What I learned: My hand mixer was a 250-watt model with five speeds. It creamed butter and sugar in 4 minutes. It mixed cake batter in 2 minutes. It whipped cream in 3 minutes. The only time it struggled was with a double batch of cookie dough — the motor heated up and smelled like burning. For cupcakes, it was always sufficient. Do not let the internet convince you that a hand mixer is inadequate. It is not.
Stand Mixers: The Upgrade
A stand mixer is a countertop appliance with a bowl that locks in place and a motorized head that holds beaters, whisks, or dough hooks. It costs R$800–3000 depending on brand and size.
Advantages:
- Hands-free — set it and walk away. You can prep other ingredients while it mixes.
- Powerful — handles thick doughs, large batches, and extended mixing without strain
- Consistent — the fixed bowl position creates uniform mixing every time
- Multiple attachments — whisks for meringue, dough hooks for bread, paddles for batter
- Professional results — especially for meringue buttercreams and whipped ganache
Disadvantages:
- Expensive — the cost is a significant barrier for most home bakers
- Heavy and bulky — requires permanent counter space or heavy lifting to store
- Overkill for small batches — a stand mixer struggles with single-batch recipes because the beaters do not reach the bottom of the bowl effectively
- Learning curve — the fixed bowl requires different techniques than hand mixing
My recommendation: Buy a stand mixer only if you bake regularly (3+ times per week), make large batches (24+ cupcakes at a time), or specialize in recipes that require extended mixing (Swiss meringue buttercream, whipped ganache, bread dough). If you bake occasionally, stick with a hand mixer. The money you save can buy better ingredients, better pans, or a course in decorating technique.
What I learned: I bought my stand mixer after two years of hand mixing. The first week, I made three batches of cupcakes simultaneously. The stand mixer handled it effortlessly. The second week, I made a single batch of vanilla cupcakes. The beaters did not reach the bottom of the bowl properly. I had to stop and scrape the bowl three times. The hand mixer had been more efficient for that small batch. A stand mixer is not always better. It is better for specific situations.
Stand Mixer Brands: What I Tested
I have used three stand mixers — one borrowed, one mid-range, and one high-end. Here is my comparison:
| Brand/Model | Price Range | Best For | My Verdict |
|---|---|---|---|
| KitchenAid Artisan | R$2000–3000 | Serious home bakers, small businesses | Excellent build, powerful, lasts decades. Worth the investment if you bake professionally or very frequently. |
| KitchenAid Classic | R$1200–1800 | Regular home bakers | Good power, smaller bowl (4.5L), fewer color options. The sweet spot for most home bakers who want a stand mixer. |
| Hamilton Beach | R$600–900 | Budget-conscious bakers | Decent power, shorter lifespan, louder motor. Good for testing whether you will use a stand mixer enough to justify a premium model. |
My recommendation: If you are ready to buy a stand mixer, the KitchenAid Classic is the best balance of price, performance, and longevity. It is the model I use daily. The Artisan is better if you bake in large volumes or want color options. The Hamilton Beach is a good trial model if you are unsure whether you will use a stand mixer enough to justify the cost.
What I learned: I borrowed a friend’s KitchenAid Artisan for a month before buying my own. That month taught me that a stand mixer changed my workflow but not my results. My cupcakes were not better. They were just easier to make. If you are buying a stand mixer expecting better cupcakes, you will be disappointed. If you are buying it for convenience and capacity, you will be satisfied.
Summary: What to Buy and When
| Equipment | Budget Option | Mid-Range Option | When to Upgrade |
|---|---|---|---|
| Liners | Standard paper (R$3/50) | Greaseproof (R$8–12/50) | When you bake for anyone other than family |
| Pans | Basic aluminum (R$30–40) | Heavy-gauge aluminum (R$60–80) | When you notice uneven baking or sticking |
| Mixer | Hand mixer 250W (R$40–80) | Stand mixer Classic (R$1200–1800) | When you bake 3+ times per week or make large batches |
Related Reading
For a complete guide to essential baking tools beyond liners, pans, and mixers, read our essential cupcake tools guide — including scales, thermometers, cooling racks, and decorating equipment that completes your kitchen setup.
Final Thoughts
Equipment does not make cupcakes. You make cupcakes. The best liner in the world cannot fix a bad recipe. The most expensive stand mixer cannot compensate for overmixed batter. The perfect pan cannot save an overbaked batch. Equipment is a tool, not a solution.
That said, the right equipment makes baking more enjoyable, more consistent, and less frustrating. A greaseproof liner means you never again deliver stained cupcakes to a client. A heavy-gauge aluminum pan means you never again pull a batch where half are raw and half are burned. A stand mixer means you can make buttercream while washing dishes, instead of standing at the counter for 20 minutes.
Buy equipment when it solves a specific problem you have experienced. Do not buy equipment because a blogger recommends it. Do not buy equipment because it looks professional. Buy it because your current equipment is failing you in a measurable way. That is the only justification that matters.
If you have equipment questions — which pan to buy, whether a stand mixer is worth it for your situation, which liners work best for a specific recipe — email me at contact@cupcakeku.com. Describe your current setup, your baking frequency, and your budget. I have bought cheap equipment, expensive equipment, and everything in between. I will help you spend your money where it matters.
Now bake with what you have. Upgrade when you need to. The cupcakes will taste the same either way.
— Mariana Costa Oliveira, Cupcake Craft Studio, São Paulo

Mariana Costa Ota is a home baker and founder of Cupcake Craft Studio. She tests recipes, equipment, and decorating techniques in her own kitchen since 2018. No recipe makes it to the site without passing through her oven (and her honest judgment) first.